Creating Slides
Every new presentation starts with a single VR/360 slide. You can add as many additional slides as you need, mixing different slide types within the same presentation.
The Slide Sidebar
The left side of the editor displays the slide sidebar — a vertical list of all slides in your presentation. Each slide thumbnail shows:
- Type badge — A colored label in the top-left corner: 360 (blue) for VR/360, 3D (dark) for VR/3D, or AR (green) for AR slides
- Slide number — A numbered badge in the bottom-right corner of the thumbnail (1, 2, 3, etc.)
- Slide name — Displayed below the thumbnail (e.g., “New slide”, “3D Space Slide”, “Around Me Slide”)
- + button — Quickly add a marker to this slide
- Edit button (pencil icon) — Open slide properties for renaming or configuration

The bottom of the sidebar shows the total slide count (e.g., “3 slides”).
Adding a New Slide
To add a new slide to your presentation:
- Click the green + Add button in the toolbar at the top of the editor
- In the dropdown menu, look under the Slides section
- Choose the slide type you want to add
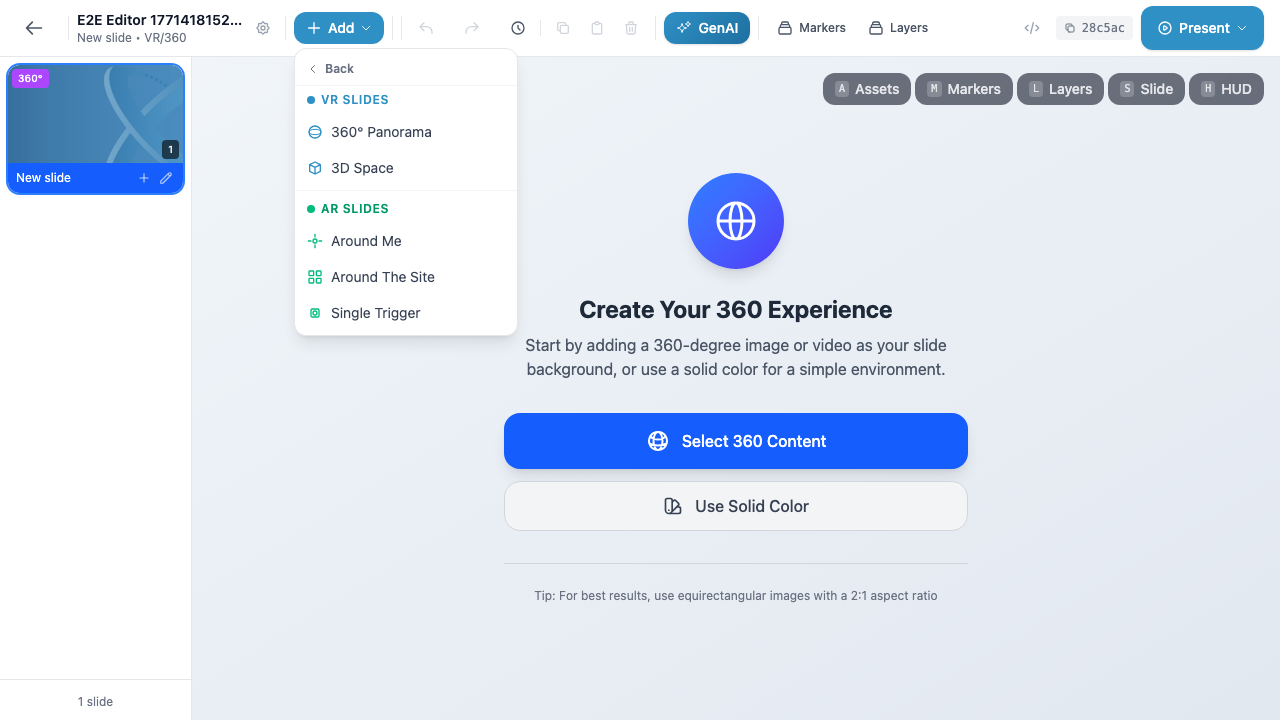
The dropdown organizes slide types into two categories:
VR Slides
| Option | Type | Description |
|---|---|---|
| 360 Panorama | VR/360 | A 360-degree panoramic slide for equirectangular images or videos |
| 3D Space | VR/3D | A full 3D environment with spatial depth and a grid floor |
AR Slides
| Option | Type | Description |
|---|---|---|
| Around Me | AR | Content placed in the space surrounding the user |
| Around The Site | AR | Content anchored to a physical location |
| Single Trigger | AR | Content activated by scanning a specific image |
After you select a slide type, the new slide is created immediately. It appears at the bottom of the slide sidebar and becomes the active slide in the canvas.
Tip
You can add slides of different types within the same presentation. For example, you might start with a VR/360 introduction slide, followed by a VR/3D interactive scene, and finish with an AR hands-on activity.
What Happens After Creation
When a new slide is created:
- VR/360 slides show a “Create Your 360 Experience” prompt with two options: Select 360 Content (to upload or choose a 360 image/video) and Use Solid Color (for a plain background).
- VR/3D slides open directly into the dark 3D environment with a grid floor, ready for you to add 3D and 2D markers.
- AR slides open into a dark preview canvas. The AR experience will render live on the user’s device during presentation.
Info
VR/360 slides require a background image or color before you begin adding markers. VR/3D and AR slides are ready for markers immediately after creation.
Slide Naming
New slides are given a default name based on their type (e.g., “New slide”, “3D Space Slide”, “Around Me Slide”). You can rename a slide at any time by:
- Clicking the edit (pencil) icon on the slide thumbnail in the sidebar
- Right-clicking the slide and selecting Edit Slide Properties from the context menu
Warning
Slide names are visible to your audience during presentation navigation, so choose clear, descriptive names that help orient viewers within your content.