Creating Markers
You add markers to slides through the QuickAdd modal – a centralized interface that organizes all available marker types into three tabs. This page walks you through every tab and explains what each marker type creates.
Opening QuickAdd
To open the QuickAdd modal:
- Click the + Add dropdown button in the editor toolbar.
- Select Markers from the dropdown menu.
The Add to Slide modal appears, showing the current slide type (e.g., “360 Slide”) in the header. The modal has three tabs across the top: Media, Elements, and Shapes.
Keyboard Shortcut
You can also press M to open the QuickAdd modal directly without using the toolbar dropdown.
Info
The QuickAdd modal adapts to your current slide type. On a VR/360 slide, only 2D marker options are shown. On a VR/3D or AR slide, additional 3D markers become available in the Elements and Shapes tabs.
Elements Tab
The Elements tab contains the core content marker types: text, icons, links, and polls.
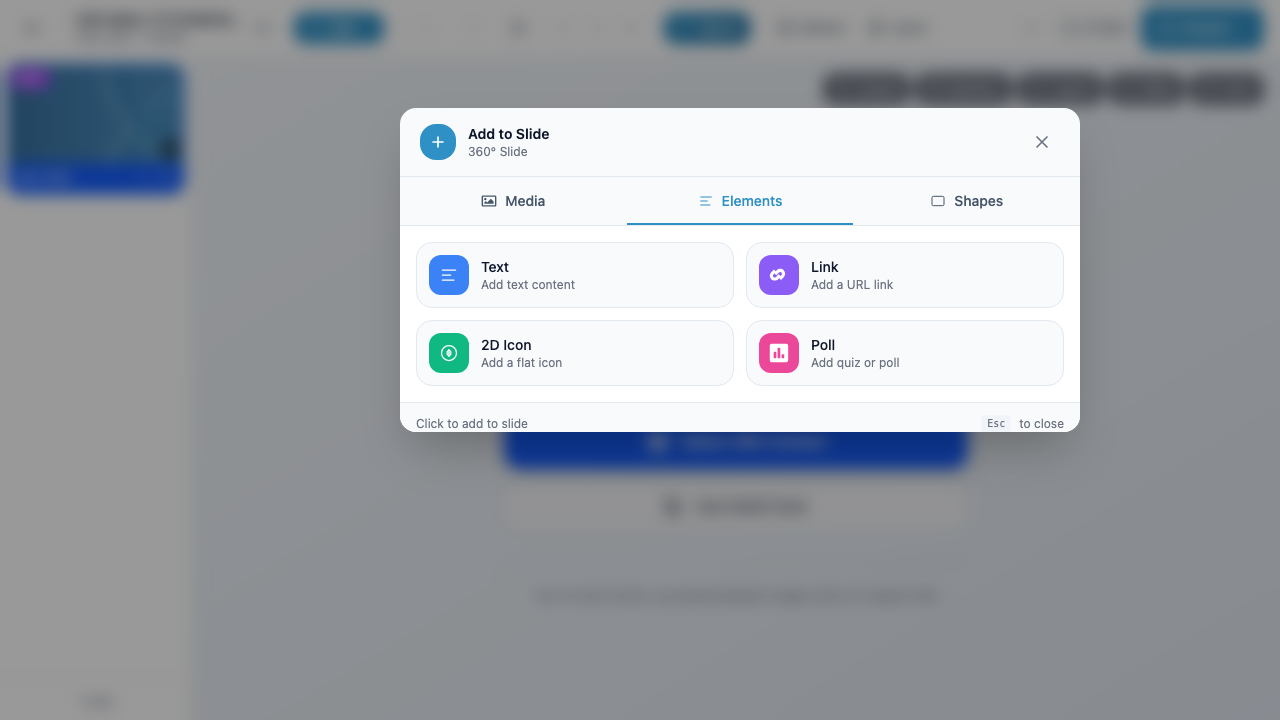
Each button shows the marker type name and a short description. Click any button to create that marker on the current slide.
Text
Click Text (“Add text content”) to create a text marker. A Textbox Properties dialog opens where you can:
- Choose a font family (e.g., Sans Serif) and font size (XS, S, M, L, XL)
- Apply bold or italic formatting
- Set text alignment (left, center, right)
- Choose text color, border color, and background color
- Type your text content in the preview area (up to 300 characters)
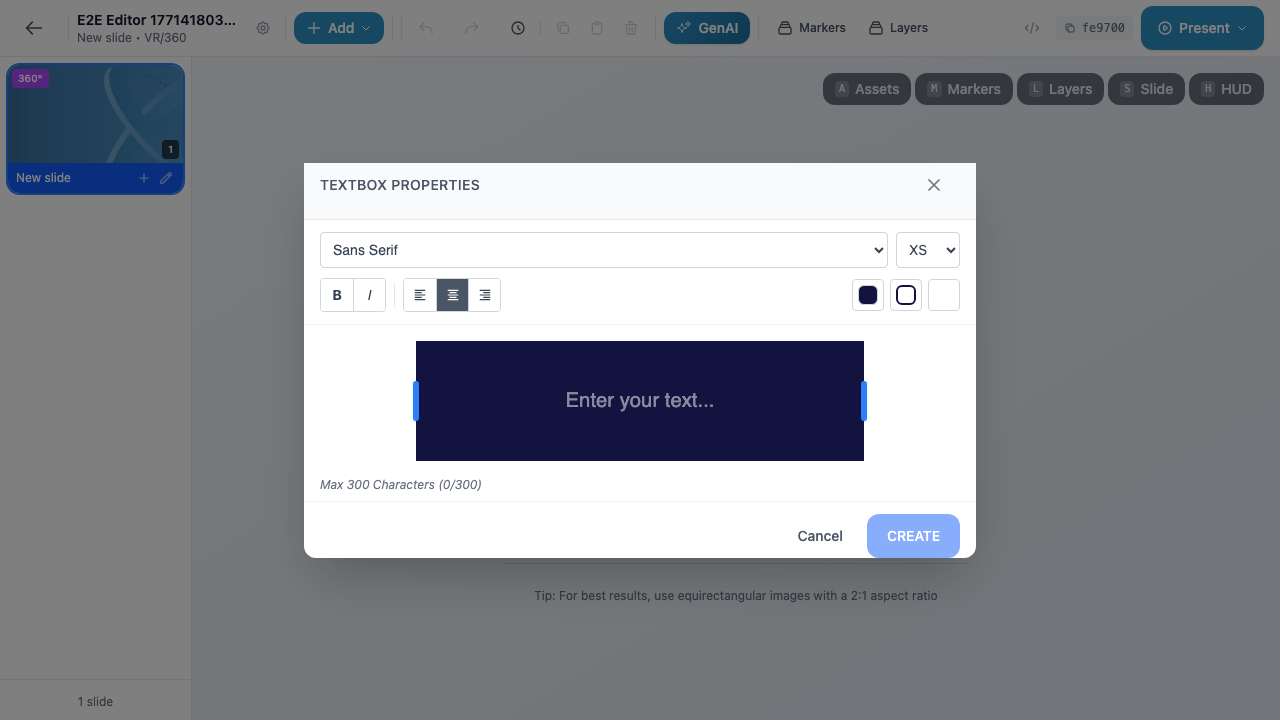
Click Create to add the text marker to your slide, or Cancel to dismiss without creating.
2D Icon
Click 2D Icon (“Add a flat icon”) to open the icon picker. Browse or search through 997 FontAwesome-style icons. Select an icon to add it as a flat 2D marker on your slide. You can customize the icon’s color and size after creation in the Properties panel.
Link
Click Link (“Add a URL link”) to create a link marker. You will be prompted to enter a URL. The link marker displays as a clickable element on the slide that opens the specified URL in the viewer’s browser during a presentation.
Poll
Click Poll (“Add quiz or poll”) to create an interactive poll marker. You can choose from three poll subtypes:
| Poll Type | Options | Use Case |
|---|---|---|
| True/False | 2 fixed options | Simple yes/no or true/false questions |
| Single Answer | Up to 4 options | Multiple choice where one answer is expected |
| Multiple Choice | Up to 4 options + correct answer | Quiz-style questions with a designated correct answer |
Poll results can be displayed during a live session using the Show Results behavior action.
Shapes Tab
The Shapes tab lets you add geometric shape markers to your slide.
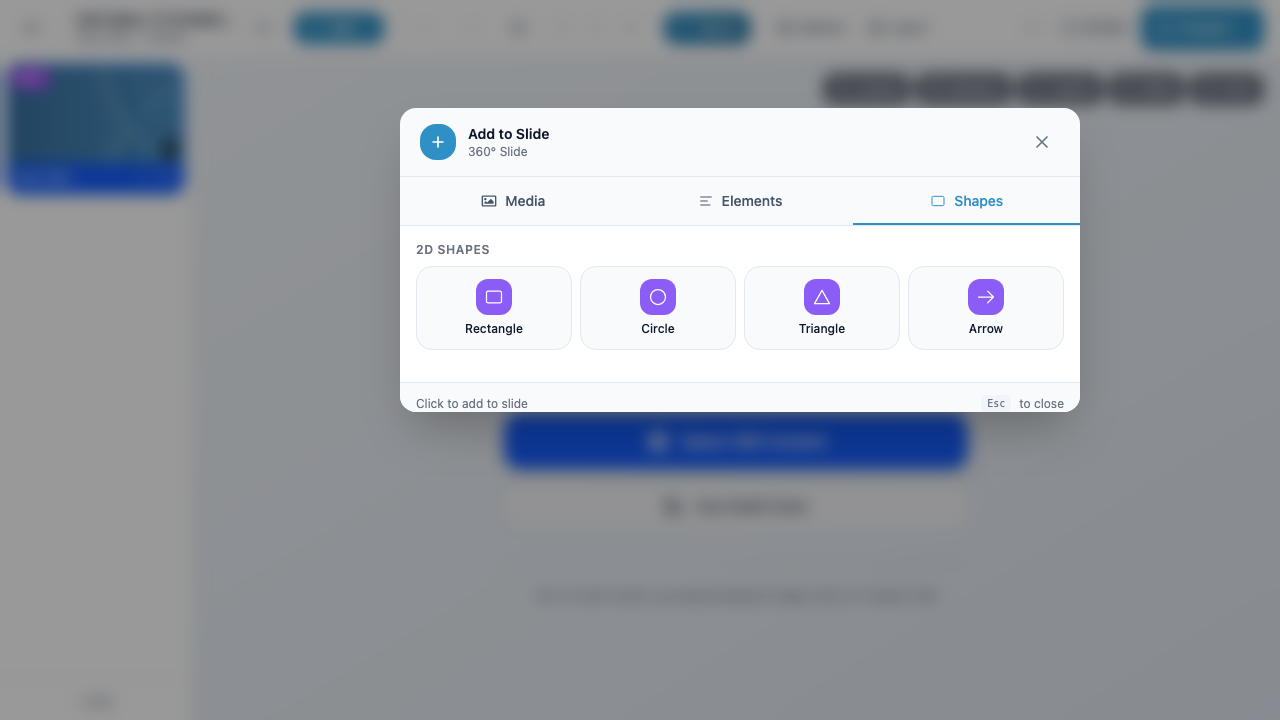
2D Shapes
On all slide types, the following 2D shapes are available:
| Shape | Description |
|---|---|
| Rectangle | A flat rectangular overlay. Useful for backgrounds, buttons, or highlight areas. |
| Circle | A flat circular overlay. |
| Triangle | A flat triangular overlay. |
| Arrow | A directional arrow. Useful for guiding attention or indicating navigation. |
| Diamond | A flat diamond/rhombus shape. |
| Star | A flat star shape. |
Click any shape button to immediately add it to the current slide.
3D Shapes (VR/3D and AR Only)
When you are on a VR/3D or AR slide, the Shapes tab also displays a 3D Shapes section below the 2D shapes. Available 3D shapes include:
| Shape | Description |
|---|---|
| Box | A 3D cube or rectangular prism. |
| Sphere | A 3D sphere. |
| Cylinder | A 3D cylinder. |
| Cone | A 3D cone. |
| Torus | A 3D doughnut/ring shape. |
Warning
3D shapes do not appear in the Shapes tab when you are editing a VR/360 slide. You must be on a VR/3D or AR slide to see and add 3D shapes.
Media Tab
The Media tab lets you add markers from your organization’s media library. This is where you add images, videos, audio files, and PDFs.
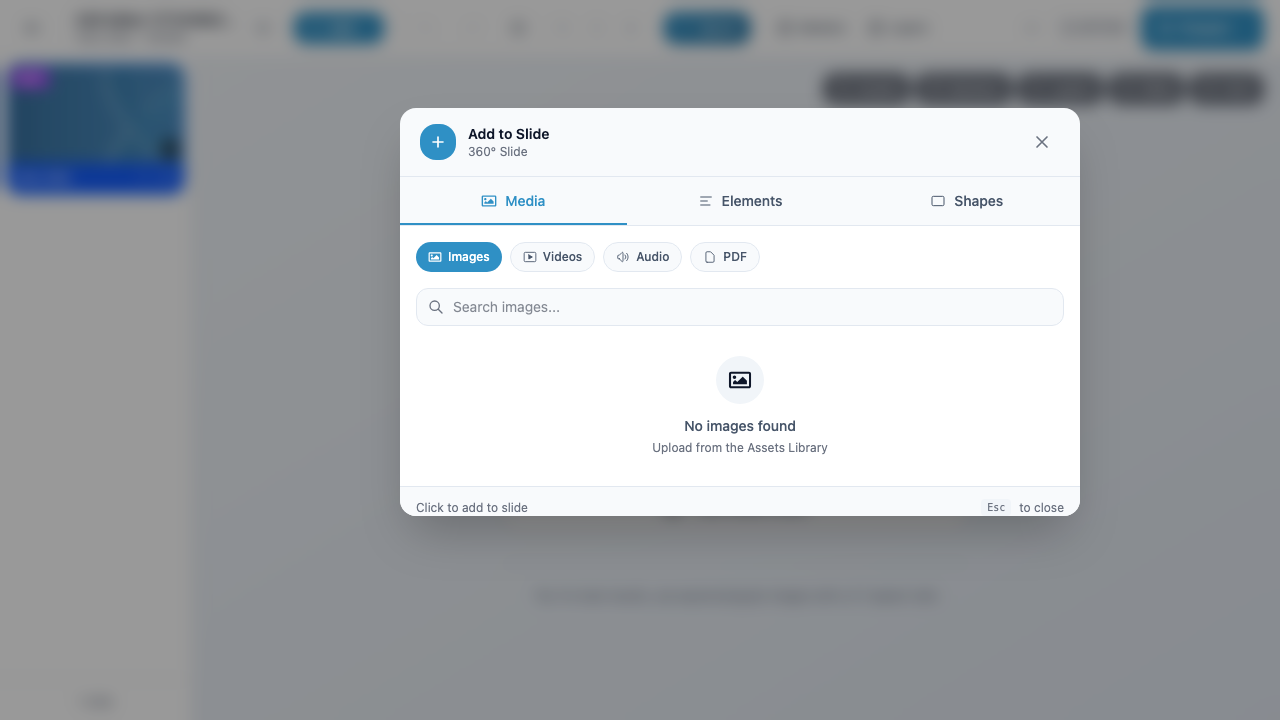
Browsing Media
The Media tab displays:
- Filter pills at the top to switch between media types: Images, Videos, Audio, and PDF
- A search bar to find specific files by name
- A grid of thumbnails showing available media from your library
If no media has been uploaded yet, you will see a “No images found” message with a prompt to upload from the Assets Library.
Adding a Media Marker
- Select a media type pill (e.g., Images).
- Optionally use the search bar to filter results.
- Click on a media item thumbnail to add it to the current slide.
The marker is created immediately on the slide using the selected media file.
Uploading New Media
If the file you need is not in your library, you can upload new media through the Assets panel (accessible from the top-right toolbar). Once uploaded, the file will appear in the QuickAdd Media tab.
Media Marker Types
| Media Type | Marker Created | Notes |
|---|---|---|
| Image | Image marker (mimg) |
Displays the image on the slide surface. Supports PNG, JPG, SVG. |
| Video | Video marker (mvid) |
Plays video inline on the slide. Supports common video formats. |
| Audio | Audio marker (audi) |
Plays audio when triggered. No visible element on the slide by default. |
| PDF marker | Displays PDF content as a viewable element on the slide. |
What Happens After Adding a Marker
When you create a marker (regardless of which tab you used), the following happens:
- The marker appears on the canvas at a default position on the current slide.
- The marker appears in the Layers panel (if open) in the marker list for the current slide.
- The Properties panel may open showing the marker’s editable settings (name, position, rotation, scale, and type-specific options).
From here you can:
- Reposition the marker by dragging it on the canvas or editing the X/Y/Z position values in the Properties panel.
- Resize the marker using the transform handles or editing scale values.
- Edit properties like color, font, or content in the Properties panel.
- Toggle options like hidden, disabled, or track in the Options panel.
- Add behaviors to define what happens when users interact with the marker (see Behaviors).
Positioning Tips
- On VR/360 slides, markers are placed on the inside surface of a sphere. Drag to reposition them within the panoramic view.
- On VR/3D and AR slides, markers exist in full 3D space. Use the transform gizmo to move them along the X, Y, and Z axes.
- Hold Shift while dragging to constrain movement to a single axis.
- Use the Properties panel position fields for precise numeric placement.
Quick Reference
| I want to add… | Go to tab | Click on |
|---|---|---|
| A text label | Elements | Text |
| An icon | Elements | 2D Icon |
| A clickable URL | Elements | Link |
| An audience poll | Elements | Poll |
| A rectangle, circle, or arrow | Shapes | The desired shape |
| A 3D box, sphere, or cylinder | Shapes (3D/AR slide) | The desired 3D shape |
| An image from my library | Media | Images pill, then select |
| A video from my library | Media | Videos pill, then select |
| An audio clip | Media | Audio pill, then select |
Next Steps
- Marker Properties – Edit marker settings after creation
- Marker Options – Toggle hidden, disabled, and track
- 2D Markers (VR/360) – Detailed reference for all 2D marker types
- 3D Markers – Detailed reference for 3D icons, shapes, and objects
- Behaviors – Make your markers interactive with triggers and actions