Behavior Conditions
Conditions are optional rules attached to a behavior that must be satisfied before the behavior’s action executes. Without conditions, a behavior fires every time its trigger occurs. With conditions, you can create branching logic, quizzes, and adaptive experiences where different things happen based on the viewer’s prior actions.
How Conditions Work
A condition checks the state of an element in the presentation – a slide, a marker, a poll, or a score value – and evaluates whether it meets a specific criterion. If all conditions on a behavior evaluate to true, the behavior executes normally. If any condition evaluates to false, the behavior is skipped entirely.
Info
Conditions use AND logic: when multiple conditions are attached to the same behavior, all of them must be true for the behavior to fire. There is no built-in OR logic, but you can achieve it by creating separate behaviors with individual conditions.
Adding a Condition
To add a condition to an existing behavior:
- Open the Behaviors modal for a marker
- Create and save a behavior (or locate an existing saved behavior)
- Click the + Add Condition link that appears below the saved behavior row
- A condition row appears with dropdown fields for you to configure
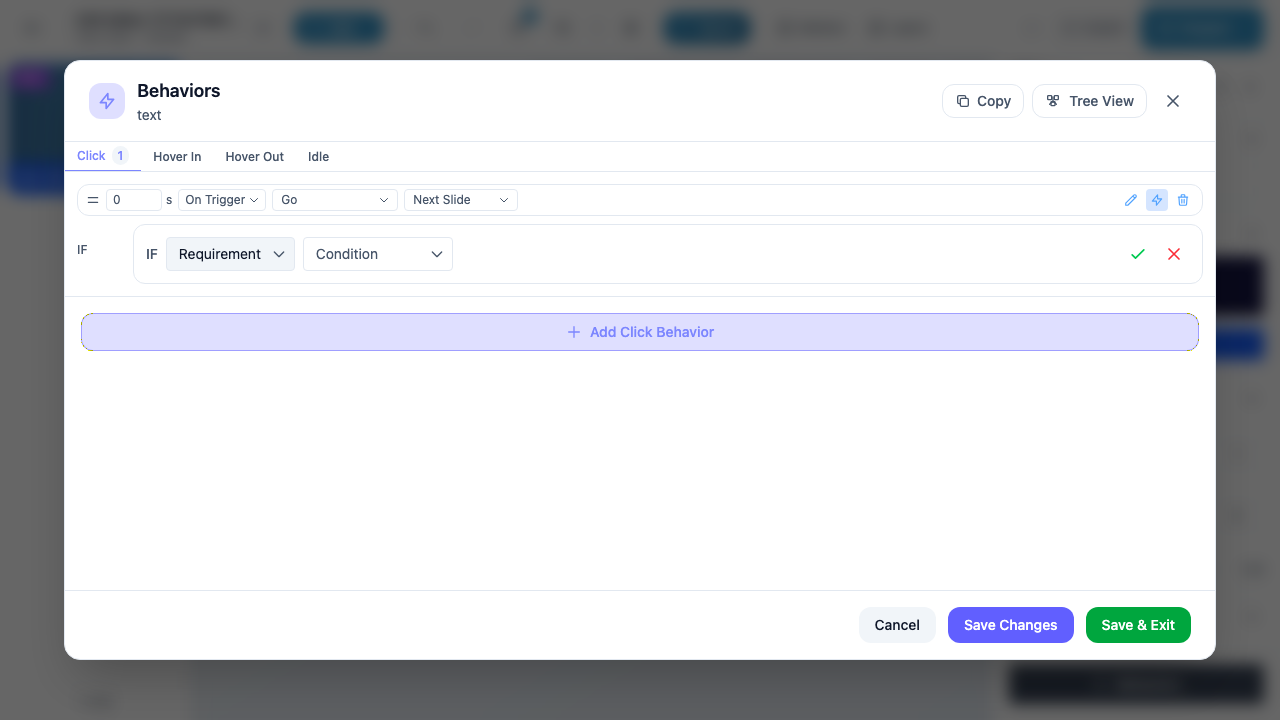
The screenshot above shows a saved behavior (“0 s | On Trigger | Go | Next Slide”) with a condition being added below it. The condition row starts with an IF label, followed by the requirement type and condition dropdowns. The “Click 1” badge on the tab indicates one behavior exists on the Click trigger.
Condition Structure
Every condition follows the pattern:
IF [Element Type] [Element Target] [Condition] [Value]
The fields are:
| Field | Description | Required |
|---|---|---|
| Element Type | The category of element to check (see Element Types below) | Yes |
| Element Target | The specific slide, marker, or poll to evaluate (only for Slide, Object, and Poll element types) | Depends on type |
| Condition | The rule to check (see Available Conditions below) | Yes |
| Value | A numeric value to compare against (only for score conditions) | Only for scores |
| Negate (NOT) | A toggle button that inverts the condition (e.g., “Has been Visited” becomes “Hasn’t been Visited”) | No (optional) |
After filling in the fields, click the green checkmark to save the condition or the red X to cancel.
Element Types
The first dropdown in the condition row selects the type of element you want to check:
| Element Type | Display Name | Description | Requires Target |
|---|---|---|---|
| local_score | Slide Score | Check the score accumulated on the current slide | No – applies to the current slide automatically |
| global_score | Global Score | Check the total score accumulated across the entire presentation | No – applies to the whole presentation |
| slide | Slide | Check the state of a specific slide (e.g., whether it has been visited) | Yes – select which slide |
| content | Object | Check the state of a specific marker on the current slide (e.g., whether it is visible, has been clicked) | Yes – select which marker |
| poll | Poll | Check the state of a specific poll marker (e.g., whether it was answered correctly) | Yes – select which poll |
Tip
When you select Object or Poll as the element type, a searchable content selector appears. This selector shows thumbnails and names of all markers on the current slide, making it easy to find the right target.
Available Conditions by Element Type
Different conditions are available depending on which element type you selected.
Score Conditions (Slide Score, Global Score)
These conditions compare a numeric score value. When you select a score condition (other than “Is NULL”), an additional numeric input field appears for you to enter the comparison value.
| Condition | Display Name | Description |
|---|---|---|
| less_or_equal | Less or Equal to | Score is less than or equal to the specified value |
| less | Less Than | Score is strictly less than the specified value |
| equal | Equal To | Score is exactly equal to the specified value |
| greater | Greater Than | Score is strictly greater than the specified value |
| greater_or_equal | Equal or More than | Score is greater than or equal to the specified value |
| null | Is NULL | Score has not been set (no value assigned yet) |
Slide Conditions
These conditions check the state of a specific slide in the presentation. You must select a target slide from the dropdown.
| Condition | Display Name | Description |
|---|---|---|
| visited | Has been Visited | The viewer has navigated to this slide at least once |
| visible | Is Visible | The slide is currently visible (the active slide) |
| clicked | Has Been Clicked | The viewer has clicked/tapped on this slide |
| success | Was Successful | The slide was marked as successful (e.g., a quiz slide was passed) |
| completed | Was Completed | The slide was marked as completed |
Object (Marker) Conditions
These conditions check the state of a specific marker on the slide. You must select a target marker from the content selector.
| Condition | Display Name | Description |
|---|---|---|
| played | Has Played | A media marker (video, audio) has been played |
| started | Has Started | A media marker has started playback |
| answered | Was Answered | A poll marker received a response |
| answered_correct | Was Answered Correctly | A poll marker received the correct response |
| visible | Is Visible | The marker is currently visible in the scene |
| enabled | Is Enabled | The marker is currently enabled (interactive) |
| clicked | Has Been Clicked | The viewer has clicked/tapped on this marker |
Poll Conditions
These conditions are specific to poll markers. You must select a target poll from the content selector.
| Condition | Display Name | Description |
|---|---|---|
| answered | Was Answered | The poll received any response |
| answered_correct | Was Answered Correctly | The poll received the correct response |
| visible | Is Visible | The poll marker is currently visible |
| enabled | Is Enabled | The poll marker is currently interactive |
| clicked | Has Been Clicked | The viewer has clicked/tapped on the poll |
Negating Conditions
Every condition can be negated by clicking the +/- toggle button that appears after you select both an element type and a condition. When negated, the condition checks for the opposite state:
| Original Condition | Negated Version |
|---|---|
| Has been Visited | Hasn’t been Visited |
| Is Visible | Is NOT Visible |
| Has Been Clicked | Has NOT Been Clicked |
| Was Answered Correctly | Wasn’t Answered Correctly |
| Is Enabled | Is Disabled |
| Equal To | NOT Equal To |
The negate button displays NOT in red when active, making it visually obvious that the condition is inverted.
Warning
Be careful with negated conditions on the first slide or at the start of a presentation. For example, “IF Slide 2 Hasn’t been Visited” will be true at the start (because nothing has been visited yet), which might not be the logic you intend.
Managing Conditions
Editing a Condition
Click the pencil icon on a saved condition to switch it back into edit mode. Change any field and click the green checkmark to save.
Deleting a Condition
Click the trash icon on a saved condition to remove it from the behavior. The behavior will then fire unconditionally (unless other conditions remain).
Multiple Conditions
You can add more than one condition to a single behavior by clicking + Add Condition again after saving the first condition. Remember that multiple conditions use AND logic – all must be true.
Examples: Combining Actions with Conditions
Quiz Feedback
Goal: Show a “Correct!” marker only when the viewer answers a poll correctly.
- Create a text marker with the text “Correct!” and set it to hidden by default (using the Hidden prop in marker options)
- Add a behavior to the poll marker:
- Trigger: Click (or use poll option triggers)
- Action: Show
- Target: The “Correct!” text marker
- Add a condition to this behavior:
- Element Type: Poll
- Target: The same poll marker
- Condition: Was Answered Correctly
Now the “Correct!” text only appears if the viewer selected the right answer.
Gate Navigation Behind Completion
Goal: Prevent the viewer from advancing to the next slide until they have interacted with a specific marker.
- Add a “Next” button marker (e.g., a shape or icon)
- Add a behavior to the “Next” button:
- Trigger: Click
- Action: Go
- Target: Next Slide
- Add a condition:
- Element Type: Object
- Target: The marker they must interact with first
- Condition: Has Been Clicked
The “Next” button only navigates when the viewer has clicked the required marker.
Score-Based Branching
Goal: Navigate to a different slide based on the viewer’s score.
- Create a “Results” button marker
- Add two behaviors to the button, both with Click trigger:
- Behavior 1: Go to “Pass” slide, with condition: Global Score Greater Than 70
- Behavior 2: Go to “Fail” slide, with condition: Global Score Less or Equal to 70
When clicked, only the behavior whose condition is true will execute.
Tip
To build OR-style logic (do X if condition A or condition B is true), create separate behaviors for the same trigger – one with condition A and one with condition B. Since each behavior is evaluated independently, either one will fire when its condition is met.
Reveal After Visiting Another Slide
Goal: Show a summary marker only after the viewer has visited Slide 3.
- Create a text or image marker on Slide 1 and set it to hidden
- Add a behavior to the slide background (or use an Idle trigger):
- Trigger: Idle
- Action: Show
- Target: The hidden summary marker
- Add a condition:
- Element Type: Slide
- Target: Slide 3
- Condition: Has been Visited
Every time the viewer returns to Slide 1, the idle trigger checks whether Slide 3 has been visited. If so, the summary marker is revealed.